Thursday, December 12, 2013

My Top 5 Handmade Gifts

I am always a little wary of giving handmade gifts that I personally make to people for Christmas. (Though, I love to give gifts that other people make!) Somewhere in the back of my mind there is a little voice saying "It's not good enough! Or it'll look like I'm being super cheap!" I listen to what toys my children want and think that maybe they won't like what I have made with my own two hands for them. I start projects and get frustrated with them and quit.

I have been analyzing these thoughts in my head lately and I realize that most of these issues that I have are all in my head. That they are not what is reality and are indeed lies. They come from my own insecurities and my lack of self confidence and of course the ever so popular "pride".  As I have been perusing Pinterest and peer blogs, my way of thinking is slowly changing. Cough it up to this blog series by one of my favorite "simple living" blogs . She has made a ton of gifts for her family for Christmas. This is very sweet and a way to make her gifts more personal.

Presently, I think making Christmas gifts can be one of the sweetest things ever... if done right. When I say "right" I mean actually taking into consideration what the person receiving the gift would like. Of course, there will be a few "blanket" gifts that you give to a bunch of friends such as fudge, cocoa, or handmade soaps. A sort of one size fits all gift. But even those gifts are given some thought as to whether a person will like them or not. Secondly, I think you also have good craftmanship. It cannot be a half-hearted thing or you'd be better off not giving the gift at all. I am not saying everything has to be perfect because frankly, who can live up to that standard! It just needs to be well made.


So with those thoughts, I will share with you what I have on my list to make. Some of these are actually completed and I hope to post pictures soon.

Source
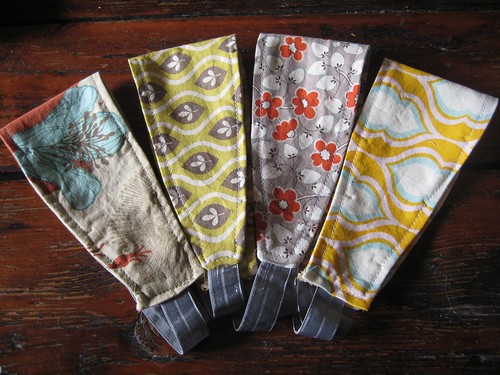
These headbands would be perfect for any little girl (or big one). They can be made double sided and fit snuggly against their little heads. You can find the tutorial here.


These hair pins that Christina, from A Home Maker's Journal, designed are a sure way to dress up any hairstyle. Plus, it is a sure way of keeping hair out of my girls' eyes. If you are interested about how she keeps those cute little buttons in place, you can find the complete tutorial here. For those of you who don't have the time to make handmade gifts check out Christina's Etsy Shop. She has beautiful Calligraphy and other handmade items. 


Ohh MY! These are the most adorable little mice e-v-e-r!!! I believe that this is something that all of my children will just love, especially my youngest girl.  Currently, she is into all things "tiny". 

You can read more about them here. If you would like to purchase the pattern from Larissa's Etsy shop here. She also has really awesome softie patterns available in her Etsy shop.

Source

For those of you who are searching for more of a "grown up gift" look no furthur. These are 3 ingredient lotion bars that are sure to smooth out those dry, cracked feet. If this doesn't sound appealing to you, simply pour these into empty jars for lip balm. (There is also an alternative recipe for a more "luxurious bar".) A complete turorial can be found here along with some other DIY projects.

Source

Lastly, but not least, I would like to show you these bad boys. Homemade Soap! Yes, I said it homemade soap! Rachel has written an awesome tutorial on "A Beginner's Guide to Soapmaking" complete with step by step pictures. Her recipe is simple and she even tells you where she got her ingredients.  If you use her recipe, it should yield about 14 bars of soap.


There you have it,  my list of my top 5  handcrafted gifts for this season!

Merry Christmas and good luck with your handmade gifts!

Jess


*Disclaimer* I have made every effort to follow each blogger's individual policy on linking to their site or posting a picture. If I have linked to your site or posted one of your pictures and you would like me to remove it please contact me at: simplyjessinteriors@gmail.com. Thanks!

Wednesday, December 4, 2013

Chalkboard Table Reveal & Christmas Gifts

Well, I know it has been a while since I last blogged, but today I feel as though I have a little "extra" time. 

I never showed you how my chalkboard table came out.  Here are the before pictures.


 The top had several gouges that I filled in. You can read more about it here.  After I sanded and painted the table the gouges weren't noticable.  


This is what table looks like now. I decided to use black tinted chalkboard paint so the kids could draw on it. I haven't had a chance to take "stylized" pictures, but you get the idea. I painted legs with chalkboard paint to keep uniformity with the top. 


If you want an idea of the dimensions of the table, that is an outline of my son, Seeley, in the picture. Say about two feet...give or take a little. I'm quite the artist right?...Okay, only in my dreams! But the great thing about having little ones is that they don't care if you're a horrible artist. It is more of the time spent with them that counts. 

Seeley is super excited to play with his trains and cars on the table. We regularly draw roads and scenery for his cars. 

Another way we use the chalkboard table is for my oldest daughter to practice her spelling words. It makes learning a little more fun. 

Besides being an art table, it doubles as an oversized coffee table in the living room. It is still a little too tall for this, but we may eventually cut down the legs and inch or two. I have two little foot stools that tuck perfectly under the table. The kids use these as chairs when they are making their chalk creations. 

One thing that I want to note about chalkboard paint is oils show up on it very easily, but these can be wiped off. 

XXXXXXXXXXXXXXXXXXXXXXXXXXXXXXXXXXXXXXXXXXXXXX

The past couple of weeks I have been working steadily on a few handmade gifts for Christmas. These will go mostly to family, but some will go to friends as well. 

On the list to make this week is homemade soap. I have been dying to attempt to make homemade soap for at least a year, but with Christmas coming I have more motivation to attempt it. It's one of things that feel completely overwhelming to try, but from what I've read it is very doable and maybe "easy". 

Hopefully, I will get a few pictures posted soon of my soap and some links to tutorials.

In my next post,  I will reveal the other little gifts that I have been working on.  

Wednesday, October 23, 2013

So... life has been pretty busy around here. I went yard sale shopping two weekends ago, so I did not get to work on fixing up anything. I did find some awesome deals that I will share with you later. This past weekend I was out of town visiting friends. It was nice to relax and drink a cup of coffee or two with them. 

 My family isn't expecting company until this weekend so I have most of the week to take over the house with my upholstering and painting projects. A local flea market is having a sidewalk sale the first weekend in November and I am trying to prepare a few things to put in it. 

XXXXXXXXXXXXXXXXXXXXXXXXXXXXXXXXXXXXXXXXXXXXXXXXXXXXXX

Here is what I have been working on these past few days. 


I picked up this table a couple of months ago at a yard sale. I had originally wanted to use it as an oversized coffee table, but after I got it home I realized that it was too tall for that. 


I think it was originally a display table. What ever gave me that idea? Well....maybe it's the giant duck head logo attached to the front of the table. 

Since I don't want to cut the legs down, I have decided to use it as kiddie table for when we have dinner guests over. It is also VERY useful for the kids to do their school work on. We were also able to get a few chairs on loan to use with this.


The table top had a few gouges in it. After I sanded the original finish off,  I filled the gouges in with some wood filler. You can see what I used here.


Then, I sanded it down using a sanding sponge. I chose the sanding sponge because it had the beveled side that could fit in between the detail work. I neglected to photograph the actual table top for you, but I will be sure to in the near future.  


That's all I have to show you for now. I look forward to showing you more soon! 


Thursday, October 10, 2013

The Swivel Chair

I have so many DIY projects that I would like to conquer, but I feel like everything is going at a snail's pace. I am having to learn to be patient and take one project at a time. 

With that said, here is what I have been working on this week.


It is the swivel chair that I purchased at a yard sale last month. 


Here is a closer look at the legs. 

They were originally a chrome color. If you would like to see the original you can see it here. The new color is called "Hammered Finish" by Krylon. It comes in a spray paint and adheres to plastic, wood, ceramic, and metal. I used this spray a couple of years ago on the handles of my dresser. 
Sorry, I don't have any photos of it. 


Did you see my friend the spider? It appears that he wanted his photo taken too.


I am still unsure what I need to do with the seat cover because it has some wear on it.

Any suggestions?

Tuesday, October 8, 2013

Finished Picture Frame Reveal/ Fair Weekend

Over the weekend I didn't get a lot finished, but I did get to pick up one of these. 
source

It's called a tack puller. It is REALLY useful tool for stripping a piece of furniture. Stripping furniture takes a lot more time than you would imagine because you have to get every S-I-N-G-L-E tack or staple out of the frame.  If you do not have a tack puller, a flat head screw driver will be sufficient, but it will go A LOT slower. Trust me on this one. 
I couldn't find one at my local walmart or Lowes, but I finally found one at my local lumber store. I purchased my tack puller for under $5. 

xxxxxxxxxxxxxxxxxxxxxxxxxxxxxxxxxxxxxxxxxxxxxxxxxxxxxxxxxxxxxxxxxxxxxxxxxxxxxxxxx

I also finished the chalkboard picture frame. 


The paint has to cure for a week, so I cannot test it out just yet. I am sure this will become filled with my beloved children's artwork.

The "fishbowl" is filled with unrippened persimmons and pinecones. The pumpkin came from my grandfather's garden. He's such a great gardener.


He even won the 1st place ribbon for the best giant pumpkin in the parish fair. 


 I thought I'd sneak in a photo of the kids riding the cars at the fair. You can't make out the expression on my 7 year old daughter's face, but I don't think she's too happy riding on this kiddie ride. My younger daughter and oldest son were thrilled with it though. 


Wednesday, October 2, 2013

Little Painted Surprises & Cleaning Like a Mad Woman

My children are supposed to be napping currently, so I thought I would steal a few moments away for myself. Though as I type this, I hear a merry little midget trying to hid discreetly behind the couch.  (I quickly shooed him back to bed.)

Today the house is bustling as I try to get ready to entertain a small group tonight at my house. I have a five and a half hour count down until they arrive, which seems like a lot of time IF my house wasn't in total shambles. I have laundry strewn around and in piles in several rooms now, but at least it is all washed and OFF the floors! I already got the breakfast and lunch dishes washed. While I was cleaning the living room I found this.


Here is a close up.


 I left my paint and brushes out the other night when I was painting my picture frame. I am lucky that this is what I discovered instead of the paint being poured out onto the floor or having tiny hand prints on the wall. My 7 year old painted this and I think she is quite talented with a giant foam brush. She is much more talented with a paint brush than her dear mother. She inherits this from her Aunt.


I also wanted to show you what chalk paint I chose for this project, Glidden's "Great Slate" paint with the Disney logo. It was about $11 a can, but it does not take a lot of paint for each coat. I will definitely have enough paint for several big projects down the road. The best thing about this paint is that you can get it all over yourself and it literally washes off with water and light scrubbing. 

The paint I chose to do the mat frame in is from Hobby Lobby and was about $8. I purchased this several years ago, maybe four, and it is still in quality condition to paint with. It is called "champagne gold". In my pictures it does have a gold tint to it, but living room has dark lighting, so it looks more like a silver to me. 

Well, I better get back to cleaning like a mad woman!

Tuesday, October 1, 2013

Picture Frame & Chalk Paint

Today was one of those days that I felt highly unproductive. I did get a lot accomplished...just not the fun stuff! 

The other day I gave you a preview of the picture and frame that I was going to paint. 


Here is a better photo of it. I have been scouring the thrift shops around town for about a month for a big frame. I really did not care if it had glass in the frame. I wanted to create a more appealing way to showcase the children's artwork...ya know...instead of using the refrigerator door. Don't get me wrong, I don't mind using the refrigerator door to display the artwork, but it just won't stay put. It falls off the refrigerator door at least three times a day. Then, it gets stepped on. Finally, it gets torn and I end up sneaking it in the trash before the kids catch me. (Thankfully they're still too little to realize when their artwork is missing.) It just is not the most efficient place to display things on. 

Instead of using this to display the kids' coloring pages, I decided to make a chalkboard out of it. That's very typical of my style...repurposing things...even the already repurposed. 

So here is my progress. 


As you can see, I painted the frame black and the mat a silver color. It is actually called champagne. When I started painting it, I didn't have any masking tape, so you can see my painting blunders on the frame. When I made my shopping trip this morning, I made sure to grab some frog tape.


I had to try this tape out for myself because of all the positive reviews that it has been receiving in the blog world. I has not left me disappointed. 

All I have left is to touch up a few places on the frame and then I will paint the inside with chalk paint. 

Monday, September 30, 2013

Biting the Bullet

My Mother offered to let the grand babies sleep over this past weekend, which gave me the perfect opportunity to try out this bad boy. 


Yes, I finally bit the bullet and ordered one. Since I am just learning to upholster, I decided this would be a perfect gun for me. The best thing is..it was super affordable and it works great!

I mentioned a while back that I would reupholster the red chair within the month.
 Well, at least I got started within the month.


The chair's burlap needed to replaced on the deck. 


Here's a close up of it freshly stapled in place. 


And here is the front. 
 (Please excuse the mess, I am currently overtaking my living room with my projects.)


I replaced the old cotton batting. 
When I was stripping the chair, I accidentally tore the front batting.
 I hope that won't be a problem when I recover it. 

Hopefully I can manage to get a little more done this week. I'll keep you posted as I go.

Friday, September 27, 2013

MIA & Chalkboards

I know a few of you are wondering where I have been lately? I know...I just got my blog up and running and I am slacking already. I've have had a very busy past few weeks with birthday parties, house hunting, and daily life. Not to mention that it I have been having a few love spats with the camera AND computer. 

I promise that I have some really cool projects coming up.


Like this chalkboard in a picture frame by Miss Mustard Seed. I absolutely have loved this chalkboard and frame since I have first laid eyes on it. 


Here's a sneak peek of my picture with a frame before it is painted. 


Do you recognize the bowl?

Since I am not planning on selling the picture, I will go ahead and tell you that I paid $1 for it. So that means if I mess it up completely I am out an entire $1. No biggie! 


Chalkboards are being used in a number of different ways and are easy to incorporate in any decor.


Just look at this lovely chalkboard globe used as wedding decor. Simply Stunning. 


Entire walls are even being painted in chalk paint, especially in kitchens. There is usually only one accent wall that is painted in chalk paint. In this kitchen, the chalkboard wall complements the white cabinets. 


Well, that's all for me tonight folks! My bed is beckoning me! Have a great weekend! 


Monday, September 23, 2013

A Few Tips Regarding Yard Sales

Since this weekend has been so crazy, I've been trying to decide what to write in my next post! I haven't had time to even THINK about furniture! By the way, I did get that staple gun ordered...finally. Well you caught me, maybe I thought about furniture...but just briefly.


I'll finally get to start on my reupholstery job; you know the red chair. 

It's been a little naked lately.

~~~~~~~~~~~~~~~~~~~~~~~~~~~~~~~~~~~~~~~~~~~~~~~~~~~~~~~~~~~~~~~~~~~~~~~

Well, anyway I decided to talk about shopping yard sales. But remember, I am by no means an expert in shopping yard sales. Consider this just friendly advice. 
  1. Map out your route.
    • They first thing you need to do is buy a copy of your local newpaper and locate the garage sales. Also, you will want to check your local bookoo for yard sales in your area.
    • I like to plug all my sales into my maps application on my iphone and then decide which sale I will hit first. For me this could be the one on the opposite side of town, the  one that opens the earliest, or the one in the most affuential part of town. 
    • Make your route so you can hit all of the sales in that area before you move on to another area of town.
    • Remember, the earlier you hit all of the sales, the more likely you'll get the best deals.

  2.  Know what your looking for. 
    • In order to hit as many sales as possible, you want to have an idea of what you're searching for. 
    • When hitting the sales, look past the mundane. Train your eye to look for what you're searching for and look fast. 

    3. Haggle.
    • Haggling is such a soft issue...some people don't mind lowering their prices, but others do. 
    • In the morning, people are less likely to haggle because it's still early. 
    • The closer to the afternoon, people are usually more willing to haggle because they are tired and ready to go home. 
    • If prices are not marked, don't be afraid to ask the price. If it's too high for you...then try to haggle.
I usually start my shopping right at 7 a.m. and I am done between 8:30 and 9:00. 
Most of the time, I come home with a treasure trove of items. 
Good luck hunting!


Wednesday, September 18, 2013

A Few Random Finds

I'm a little late posting so I decided to show you a few of my random finds. 


 My husband calls this the fishbowl. I thought it might be ideal to fill it with some decorative items. Maybe lemons? I actually did buy the lemons to fill the bowl, I guess I underestimated it's size. 


I also picked up this nifty swivel chair. It will double as a desk chair and extra seating for when company is over. Currently, I am trying to persuade my husband to get rid of his big bulky one. I don't think he is going for that idea. Oh well, I need a chair for my desk. 

Tuesday, September 17, 2013

A Settee For Me

Yesterday, I shared with you that I went to a few yard sales over the weekend. Well, here is my prize of the month. I am just tickled to have found this. I have been drooling over the settees that I have been seeing on different blogs and pinterest for about three months. (Okay, not literally drooling) It is amazing to see how great these bad boys look when reupholstered. I admire the talented people who take on such a large task. 
I am just so amazed at the amount of grace that God showed me in being able to find one in my area. Especially, one that fit within my budget. I have been scouring Craig's List and Bookoo as of late looking for one that fit within my budget. 

I have only seen a few online that have the wingback. I searched the Internet over the weekend and to the best of my knowledge I think this would be considered "Louis XV Style". 
(Feel free to correct me if I am wrong!) I know that this had to be manufactured in 1929 or after because of a tag underneath it, but I still cannot pinpoint the exact year. 
All of the legs are in wonderful shape. It really has great bones. 
Here is a close up of the fabric. I am not too hip on this color and pattern, but I definitely can live with it. Hopefully, in the near furture, I will be able to reupholster this. Maybe with a grey fabric? That is, if I am brave enough. 
In addition to the settee the size of a small bus, these were an added bonus. SCORE! They look like "his" and "her's" chairs. Are you getting this? They match the settee! The man actually told me that he'd only sell this to me as a set. 

I had to make three trips to get these home, which included having to borrow a truck. 
I could just hear the iconic words of Ricky Ricardo to Lucille Ball coming out of my husband's mouth when he discovered that I bought MORE furniture! 

"Lucy, You got some 'splaining ta do!" And I could just picture Lucille's deer in the headlights facial expression on my face. 

Uh oh, I'm gonna be in trouble.  

As if we needed more furniture. I took a count of how many pieces I had in my living room this morning...are you ready for it? I had 9 chairs and 2 couches. That is, if you consider the settee a couch. 

My husband is used to it by now. He even told me that I couldn't sell HIS wingback chair because he already staked his claim on it. He really is a furniture fanatic like me! 

Hopefully, I will be able to get some booth space this month.